How To Create A MetaMask Wallet
Step 1: Create a MetaMask wallet
To create a MetaMask wallet go to the official website metamask.io.
Installing MetaMask wallet to your browser
If you do not have a MetaMask wallet, get the official MetaMask wallet download from metamask.io. The browser extension version is the preferred method of wallet use, if you prefer to go mobile, you can download the app version.
If you are already using MetaMask or want to use a different wallet, feel free to skip this section.
You should ALWAYS download any wallet through the official website, to ensure that you are indeed downloading the official version.
Please Note: There are countless fakes floating around that will try to scam you of your funds, so please be careful. Remember, safety first!
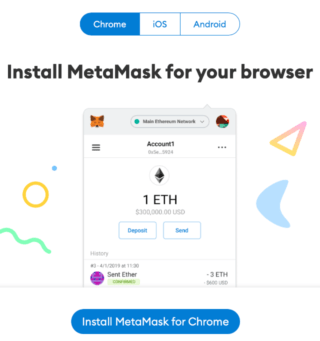
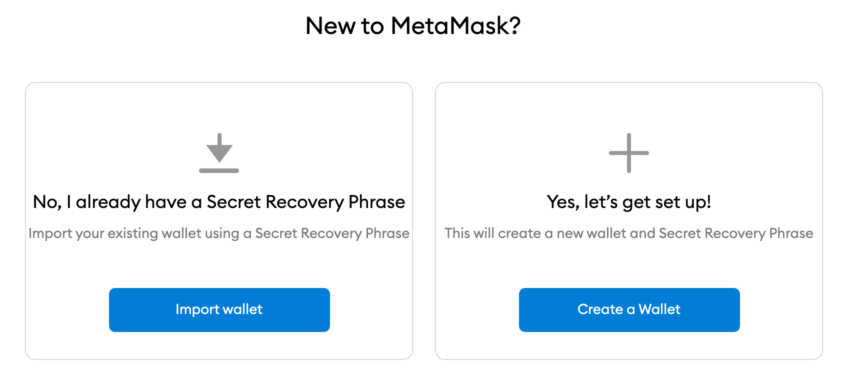
From the download section choose your preferred version, we will go with the browser extension. After you have installed the browser extension, accept the terms and services then click "Create a Wallet".
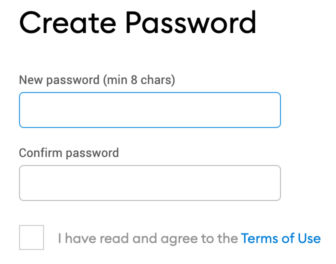
Create a password for login
Create a password for your wallet that you will remember. If you forget your password or change your device. During the setup process, you will be issued a seed phrase. This seed phrase will allow you to reset your password. You can also use this seed phrase to import your wallet to any new device.
We cannot emphasize this enough, "NEVER" give your seed phrase to anyone under any circumstance. The seed phrase is the key to your funds, so don’t lose it. Any legit site or support person will never ask you for your seed phrase, so keep in mind, if someone asks for your seed phrase this is 100% a SCAM! Run away from this person and never speak with them again, they are trying to steal your money!
Save your seed phrase somewhere safe
After you have entered your password it’s time to get your seed phrase. In the picture below you can see warnings and tips for storing your seed phrase.
If you want to go straight to the wallet, click “Remind me later”. You can download your seed phrase from inside your wallet settings. We do not recommend skipping though this section, it is very important that you write your seed phrase down on a piece of paper as backup. Your seed phrase is the only thing that can recover your wallet. If you loose it, your wallet and the funds inside of your wallet are gone forever.
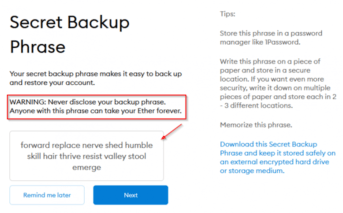
You can also download the Secret Backup Phrase from the blue text to your hard drive, we do not recommend downloading seed phrases to your hard drive though. If someone accesses your computer, they can steal your seed phrase, open your wallet and steal all of your funds. After you have written down you secret seed phrase on a piece of paper, click "Next" and you will be taken to the area where you can validate your seed phrase using what you wrote down on paper. After validation store your hand written seed phrase out of sight from everyone, in a safe place only you and another trusted party knows about.
Keep in mind, when confirming your secret backup phrase, it needs to be entered manually and in the correct order. Do not copy and paste your seed phrase into this window. Select the boxes in the appropriate order in which they were given to you to confirm your secret backup phrase.
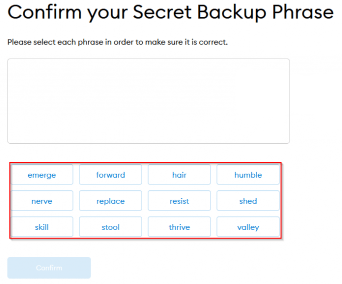
After you have input the words of your secret seed phrase, in the correct order and pressed "Confirm", you will at this point be ready to use your newly created MetaMask wallet!
Done, simple and straight forward! You have completed "Step 1", now go to "Step 2"
Step 2: Connect to Binance Smart Chain (BSC) mainnet
To connect Binance Smart Chain (BSC) mainnet to your MetaMask wallet go to the official website docs.bnbchain.org.
Connecting your MetaMask wallet to the Binance Smart Chain (BSC)
Adding a custom network to your MetaMask wallet is a super simple task...

Once you have logged into your MetaMask wallet, click the "Ethereum Mainnet" dropdown menu at the top of the app. Then click the "Custom RPC" field at the bottom.
Add (BSC) mainnet info corresponding to MetaMask
In the image below you will see where the proper Binance Smart Chain (BSC) information has been entered into the Custom RPC fields.

- Network Name: Smart Chain
- New RPC URL: https://bsc-dataseed.binance.org/
- Chain ID: 56
- Symbol: BNB
- Block Explorer URL: https://bscscan.com
After you have entered the appropriate information as above, click "Save".
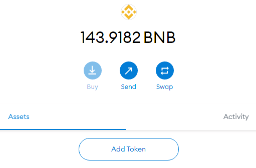
You are now able to access the "Smart Chain" network. The "Smart Chain" network should select automatically, but if it does not, simply click the dropdown menu at the top of the screen and select "Smart Chain".

Done, simple and straight forward! You have completed "Step 2", now go to "Step 3"
Step 3: Add RickRoll (ROLL) Token to your MetaMask wallet
Contract address: 0xb25c452aaC7731B3beF1ff9DAF6451036f0Ab6FB
How to add the RickRoll (ROLL) Token to your MetaMask wallet?
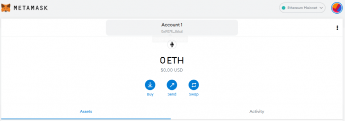
After logging into your MetaMask wallet you will see the following screen, click the "Add Token" button.
RickRoll (ROLL) Token contract address:
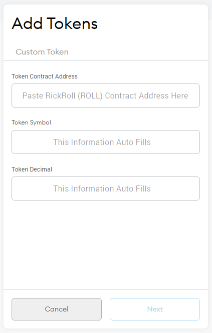
Copy the RickRoll (ROLL) Token contract address above, then paste it into the "Token Contract Address" field. "Token Symbol" and "Token Decimal" will auto fill, there is no need to touch these fields. Now click the "Next" button.
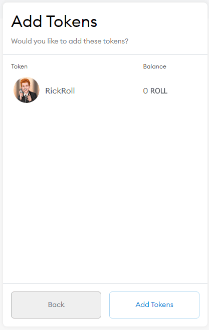
After you have clicked the "Next" button above, the following screen will appear. Now click the "Add Tokens" button.
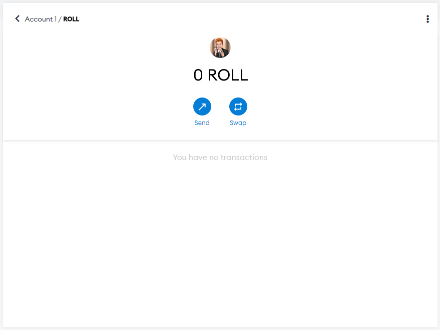
Once the "Add Tokens" button is clicked, you will then be redirected to the following screen. In the top left corner click on the left facing arrow. You will then be redirected to your wallets main page, where you will see that the RickRoll (ROLL) Token has now been added.
PLEASE NOTE: If you do not see the RickRoll (ROLL) Token logo appear in your wallet, do not be alarmed. The latest logo & token update information has been submitted to BscScan by the RickRoll (ROLL) Token Team and is slated for completion.
Done, simple and straight forward! You have completed "Step 3", now go to "Step 4"
Step 4: Buy & send BNB (Smart Chain) tokens to your MetaMask wallet
BNB (Smart Chain) tokens can be bought via Binance. If you desire a hassle-free buying experience, try ChangeNow.
How to buy & send BNB (Smart Chain) tokens to MetaMask?
If you're new to crypto, BNB (Smart Chain) tokens can be bought via Binance. If you're comfortable with crypto and desire a hassle-free buying experience, try ChangeNow. The ChangeNow service best suites, most users, in all areas and regions of the world. Also keep in mind ChangeNow is a Limitless Crypto Exchange with Fast Crypto Swaps, Free of Custody. (Free of Custody means you control your tokens)
Now that you have purchased your BNB (Smart Chain) tokens, lets send them to your MetaMask wallet address.
Sending BNB tokens to Binance Smart Chain on MetaMask
In this guide, you will learn how to send BNB tokens from the Binance exchange to your MetaMask wallet. If your country restricts Binance, you could use a VPN to access it. Let’s begin...
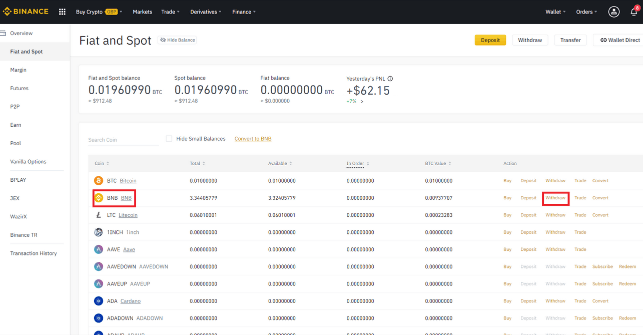
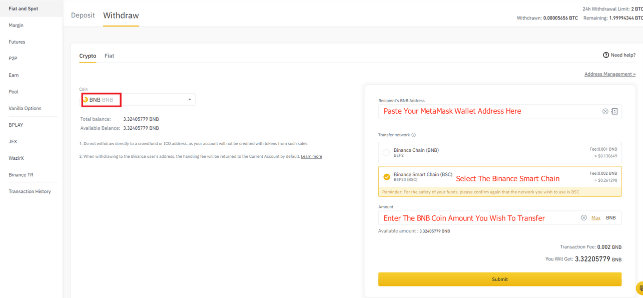
- Open your wallet in Binance exchange, select Binance token (BNB), and click withdraw.
- Go and open MetaMask. Ensure that the wallet is on the Binance "Smart Chain" network, after confirmation you are on the Binance "Smart Chain" network, copy your MetaMask wallet address by clicking on it.

- Now paste your wallet address, which you copied from MetaMask in the "Recipient's BNB Address" field. Now under the "Transfer Network" field select "Binance Smart Chain (BSC) / BEP-20". Now locate your BNB tokens on the left side of the withdrawal form. Enter the BNB token amount you wish to transfer into the "Amount" field. Verify all your information is correct and when you are 100% sure, click the "Submit" button.
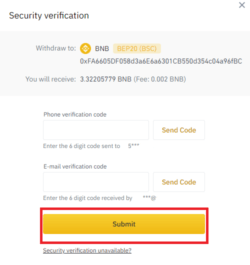
- Binance will then ask you for confirmation. Enter your phone and email verification codes, if you did not receive verification codes, click the "Send Code" buttons. Once verification codes are received and entered into the form in proper order, click the "Submit" button.
- On the next window, you will get a confirmation for withdrawal.
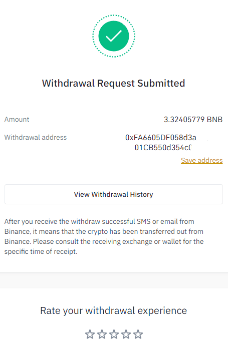
- After a few minutes, the transaction will appear in your MetaMask wallet, and you will be good to go.
Congratulations!
You have successfully sent BNB tokens to your MetaMask wallet. Following the same steps above, purchase and send USDT BEP-20 tokens to your MetaMask wallet. Both BNB and USDT BEP-20 tokens are required to swap RickRoll (ROLL) Token on PancakeSwap.
BNB is required for Binance Smart Chain gas fees, USDT BEP-20 is required to acquire RickRoll (ROLL) Tokens when you initiate the swap.
Done, simple and straight forward! You have completed "Step 4", now go to "Step 5"
Step 5: Get RickRoll (ROLL) Tokens On PancakeSwap!
First Connect your MetaMask Wallet to PancakeSwap, then Swap, it is that simple!
How To Swap USDT BEP-20 To RickRoll (ROLL) Token On PancakeSwap?
Remember to set the Slippage between 15%-19% (or possibly more, depending on trade volume) when you Swap from USDT BEP-20 to the RickRoll (ROLL) Token. Once you have done so, wait a few seconds for your transaction to go through. After your transaction has completed... Hold On for Dear Life. (HODL) your RickRoll (ROLL) Tokens and watch them grow!

Connect Your MetaMask Wallet To PancakeSwap
Sign in to your MetaMask wallet then visit the PancakeSwap website. In the top right corner you'll see the "Connect Wallet" button. Click it.

A window will appear asking you to choose a wallet to connect to. Click MetaMask (it's the top option on the list).

Done! Your MetaMask wallet is now connected to PancakeSwap, it is now time to move on to Trading.
How To Trade

Trading on PancakeSwap is very easy compared to most exchanges. You aren't going to be overwhelmed by charts or jargon, and calculations are all handled for you automatically.
Getting Set Up To Trade
If you have followed our step-by-step "Quick Guide" to this point, you can move on to the next step "Trading On The PancakeSwap Exchange".
If you jumped to Step 5 of our tutorial please note: Before you can trade RickRoll (ROLL) Tokens, you will need a Binance Smart Chain-compatible wallet. You can learn how to get one here. Note: If you do not have BNB and USDT BEP-20 (Smart Chain) tokens, you will need to have some to trade with. You can learn more about getting tokens here.
Trading On The PancakeSwap Exchange
- Go to the exchange page here.
- Unlock your Binance Smart Chain-compatible wallet by clicking "Unlock Wallet".
You can also connect your Binance Smart Chain-compatible wallet using the "Connect" button located in the top right-hand corner. If you have yet to connect your wallet to PancakeSwap, you can view the guide here. - Enter the amount of ROLL you wish to acquire. Set the Slippage between 15%-19%. Then click the Swap button.
Note: If the swap fails, increase the slippage percentage until your swap is accepted. - A window with more details will appear. Confirm that the details are correct. When you are ready, click the "Confirm Swap" button. Your wallet will ask you to confirm the action. Once the action is confirmed, the transaction will execute. Your wallet will receive RickRoll (ROLL) Tokens.
- You can now click "View on BscScan", if you wish, to see your transaction details on the explorer.
Congratulations! You are now the proud owner of RickRoll (ROLL) tokens.
Remember, Hold On for Dear Life. "HODL" your RickRoll (ROLL) Tokens and watch them grow!
You have completed "Step 5", the final page of the "Quick Guide".
Click here to go back to the Home page.